

When Christmas rolls around, nothing sets the festive mood quite like a beautifully lit tree and sparkling outdoor decorations. But here’s the thing, those twinkling displays don’t just happen on their own. Behind every magical glow is something most people overlook: LED wiring. And trust me, it matters more than you think.
Why?
Because proper wiring isn’t just about making the lights turn on. It’s about keeping your holiday decorations safe, energy-efficient, and long-lasting. A poorly handled wire for LED lights can lead to flickering bulbs, uneven brightness, or even electrical hazards. On the other hand, neat and reliable LED connections ensure that your Christmas lights shine brighter, use less power, and last through the entire season without a hitch.
Think about it—wouldn’t you want your lights to dazzle all December long without stressing over sudden failures? That’s where understanding LED wiring comes into play.
So, if you’re ready to take your Christmas lighting game to the next level, stick around. This guide will walk you through everything you need to know to wire safely, efficiently, and beautifully. Let’s dive in and get your holiday project started today!
Key Takeaways:
- Proper LED wiring for safety, efficiency, and long life.
- Match the wire gauge to your LED setup.
- Know your LED wire colors and strip pinout.
- Always ground your fixtures for safety.
- Parallel circuits work best for Christmas lights.
- Troubleshoot issues like shorts or burnt bulbs early.
- LEDs beat regular lights in efficiency and durability.
Understanding LED Wiring Basics
What is LED Wiring?
At its core, LED wiring is the setup that connects your LED lights to a power source so they can shine bright and steady. Think of it as the “roadmap” that directs electricity where it needs to go. This system typically includes three main parts:
- Wire gauges – the thickness of the wire, which determines how much current it can safely handle.
- Power supply – the transformer or adapter that converts household electricity into the right voltage for your LED lights.
- Controllers – optional but handy, these let you dim, flash, or change colors with just a button or remote.
Put simply, LED wiring is the backbone of every glowing Christmas display, whether it’s on your tree, rooftop, or garden.
Why Proper LED Wiring Matters
Here’s the deal: if you don’t use the right wire size or make secure LED connections, your lights might not just flicker, they could overheat, burn out, or even pose a fire hazard. That’s the last thing you want during the holidays.
Choosing the correct gauge wire ensures electricity flows smoothly without straining the system. And don’t overlook the ground wire purpose—it acts as a safety shield, protecting you from electric shocks if something goes wrong.
Proper wiring also keeps your lights efficient. Instead of wasting power or losing brightness, you’ll get a clean, reliable glow that lasts all season. In short, safe and accurate LED wiring is the secret to a holiday setup that’s not only dazzling but also worry-free.
LED Wiring — Wire Gauge Reference
Quick reference for choosing the right wire for LED lights during Christmas projects. Use this table to match wire gauge to current, distance and common holiday uses.
| Wire Gauge (AWG) | Max Current (A) | Common Use | Recommended Max Run | Notes / LED Connections |
|---|---|---|---|---|
| 22 AWG | ~5 A | Small indoor string lights, micro LED strips | Up to 5 meters (short runs) | Best for short runs; use proper soldered or crimped LED connections. |
| 20 AWG | ~7 A | Indoor/outdoor decorative strings, small controllers | Up to 7 meters | Good balance of flexibility and capacity. Consider thicker feed wires for longer runs. |
| 18 AWG | ~10 A | Heavier outdoor strings, small LED strip runs | Up to 12 meters | Common choice for house roofline lights; observe ground wire purpose on mains-powered setups. |
| 16 AWG | ~13 A | Longer outdoor runs, multiple strings in parallel | Up to 20 meters | Use for higher-current controllers and dimmers; keep connections protected from moisture. |
| 14 AWG | ~17 A | Power feeds, transformer input leads | Over 20 meters | Good for main feeds to multiple LED zones; recommended for supplying power to DC transformers. |
Tip: always match wire sizing to the actual current draw of your full LED string and the controller you use. When in doubt, choose the thicker wire and ensure secure, weatherproof LED connections.
Choosing the Right Wire for Your LED Lights
What is a Wire Gauge?
Wire gauge is simply a number that tells you how thick a wire is. Sounds boring but it’s actually everything when it comes to led wiring. Lower AWG numbers (like 14) mean thicker wire; higher numbers (like 22) mean thinner wire. Why care? Because thickness controls how much current the wire can safely carry, how much it heats up, and how far you can run power without losing brightness.
Here’s the thing: pick the wrong gauge and your lights might dim, your connectors could overheat, or your power supply may be strained. Scary, right? So let’s make this simple and useful.
How to Choose the Right Wire Size for Your LEDs
Ask yourself three quick questions before buying wire: How much current will my lights draw? How far will the run be? Will the setup be indoors or exposed to weather? Those three things decide your wire choice.
First, figure out the total amperage of your LED string or strip (check the spec sheet or measure). Next, consider run length: long runs mean more voltage drop, so you may need a thicker wire to keep brightness even. Finally, think about environment: outdoor setups need tougher insulation and weatherproof connectors.
Also remember the role of your power supply and controller. If you’re using a dimmer, RGB controller, or a higher-voltage supply, that changes current flow and may push you to a thicker gauge. Keep your LED connections tight and protected — solder or quality crimps are best, and heat-shrink or waterproofing is a must outdoors.
18 Gauge Wire for LED Lights
18 AWG is the crowd-pleaser for many holiday displays. Why? Because it’s a good balance of flexibility and current capacity. Use 18 AWG for mid-length runs like roofline strings, moderate LED strip sections, or feeding multiple small strings in parallel. It handles more current than 20–22 AWG and stays easy to work with.
Pro tip: for outdoor rooflines or longer runs pair 18 AWG with weatherproof connectors and secure routing to avoid wear.
22 Gauge Wire for LED Lights
22 AWG is thin and flexible — perfect for indoor décor, tight spaces, tiny LED strings, or micro strip lights. Use it for short runs where current draw is low. But be careful: 22 AWG isn’t great for long distances or high-current controllers. If you push it too far, expect dimming or heat buildup at connectors.
In short: great for delicate indoor work, not the best for powering long outdoor runs.
14 Gauge Wire for LED Lights
14 AWG is the heavy lifter. Choose this when you need long runs, high current, or to supply a transformer that feeds several LED zones. This gauge reduces voltage drop over distance and keeps your system cool and stable. It’s less flexible and bulkier, so plan routing and strain relief carefully.
Bottom line: use 14 AWG for main feeds and serious outdoor installations, and use thinner wires only for branch runs where appropriate.
Common LED Wiring Diagrams
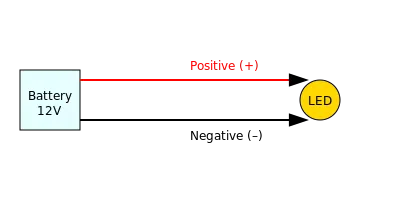
2-Wire LED Light Wiring Diagram
The simplest form of led wiring is the 2-wire setup. You’ll see it in most single-color Christmas lights. One wire carries the positive (+) current, while the other serves as the negative (–) return path.
Here’s how it works step by step:
- Connect the positive wire from your LED string to the positive terminal of your power source.
- Connect the negative wire directly to the negative terminal.
- Double-check polarity — LEDs are polarity-sensitive, meaning they won’t light up if wired backwards.
This setup is straightforward, but it’s also where ground wire purpose and secure LED connections really matter. Always ensure clean, tight joints to prevent flickering or shorts.
4-Wire LED Light Wiring Diagram
Things get more interesting when you’re dealing with RGB LED strips. These use a 4-wire system. One wire is the common positive (usually labeled +12V or +24V), and the other three wires are negatives for the Red, Green, and Blue channels.
Here’s the breakdown:
- Wire 1: Common positive supply.
- Wire 2: Negative for Red LEDs.
- Wire 3: Negative for Green LEDs.
- Wire 4: Negative for Blue LEDs.
A controller regulates how much current flows through each channel, mixing colors to create the full rainbow effect. Without proper wiring here, you’ll end up with missing colors or uneven brightness.

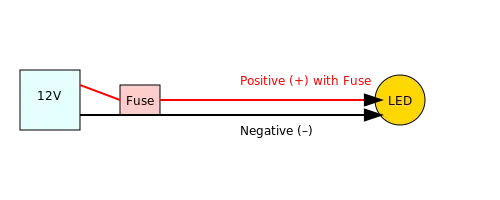
Wiring LED Lights to a 12V Battery
Many Christmas setups use 12V LEDs, so connecting to a 12V battery is a practical option. To do this safely:
- Identify the positive and negative leads of your LED string.
- Connect positive to the battery’s positive terminal, and negative to the battery’s negative.
- For safety, add an inline fuse close to the battery to protect against short circuits.
Always avoid overloading your battery. Match its capacity with the current draw of your lights. And remember, secure LED connections prevent dangerous sparks and keep your holiday glow reliable all season long.
Grounding and Other Important Wiring Considerations
What is the Purpose of a Ground Wire in LED Lighting?
In any led wiring setup, the ground wire is your silent safety guard. Its main job is to redirect stray electrical current safely into the earth if something goes wrong. Without it, a short circuit or insulation failure could turn your light housing into a shock hazard.
So, properly grounding light fixture setups not only protects your LEDs but also safeguards you and your family from electrical accidents.
What to Do if Your Light Fixture Has No Ground Wire?
Now, what if you’re working with a light fixture without ground wire?
Don’t panic.
It doesn’t automatically mean your project is unsafe. Instead, you need to be extra careful. Always connect the hot and neutral wires properly and use a GFCI outlet if possible for added protection. In older homes, this is a common scenario, so upgrading the wiring or adding a ground may be the safest long-term fix.
At the very least, ensure your LED connections are secure and insulated.
Grounding LED Lights in Different Installations
Grounding requirements vary depending on the setup. In home installations, grounding every metal fixture is non-negotiable. Outdoors, weatherproofing plus grounding is key for durability and safety.
For automotive LED wiring, grounding directly to the vehicle chassis is standard practice. Each scenario demands attention, but the principle stays the same: proper grounding ensures your LED system runs safely and reliably.
Troubleshooting and Tips for LED Wiring
Common LED Wiring Issues and How to Fix Them
Even the best setups can run into problems. One of the most common issues in LED wiring is using the wrong wire gauge, which causes dimming or overheating. The fix? Match your wire size with the current draw and distance of your lights. Another issue is loose or corroded connectors—these lead to flickering. Always check and reseat your LED connections or replace connectors if needed.
Short circuits can happen too, especially if wires touch where they shouldn’t. Use proper insulation and never leave bare wire exposed. For holiday displays, burnt-out bulbs in series can sometimes affect the whole string. That’s where a Christmas light shunt comes in—it keeps current flowing even if a single bulb fails.
Tips for Installing LED Lights Safely
When installing, always work with low voltage whenever possible, as it reduces risks dramatically. For higher-voltage systems, don’t skip grounding. Another key safety step is ensuring proper insulation, especially for outdoor setups exposed to rain or snow.
Check your wiring and lights regularly throughout the season to catch issues early. And if you’re dealing with damaged strips or fixtures, consider LED light circuit board replacement instead of discarding the whole unit. A little care goes a long way toward extending the life of your lights while keeping your holiday glow safe and steady.
LED vs Regular Christmas Lights
Energy Efficiency and Performance
When comparing LED vs regular Christmas lights, LEDs easily take the crown. They use far less energy, stay cool to the touch, and last much longer. With proper LED wiring, you can run larger displays without worrying about high bills or overheating. Regular incandescent bulbs, on the other hand, waste energy as heat and often burn out mid-season.
Installation and Wire Considerations
LEDs also give you flexibility in setup. Clear labeling of LED wire colors makes connections easier, while the correct wire gauge for LED lights ensures steady brightness across your display. Traditional lights lack these efficiencies, often relying on heavier wiring to handle higher current.
Safety and Reliability
Another win for LEDs is safety. They’re less likely to overheat and keep your décor glowing even in tough weather. With smart planning and quality products like Holiday Light Works, you can enjoy a dazzling, reliable display year after year.
How LED Wiring Works for Christmas
When it comes to holiday decorations, the way your lights are wired makes a big difference in how they perform. Christmas lights can be connected in two main ways: series wiring and parallel wiring.
Both methods have their pros and cons, and knowing the difference helps you understand why some strings go dark while others keep glowing.
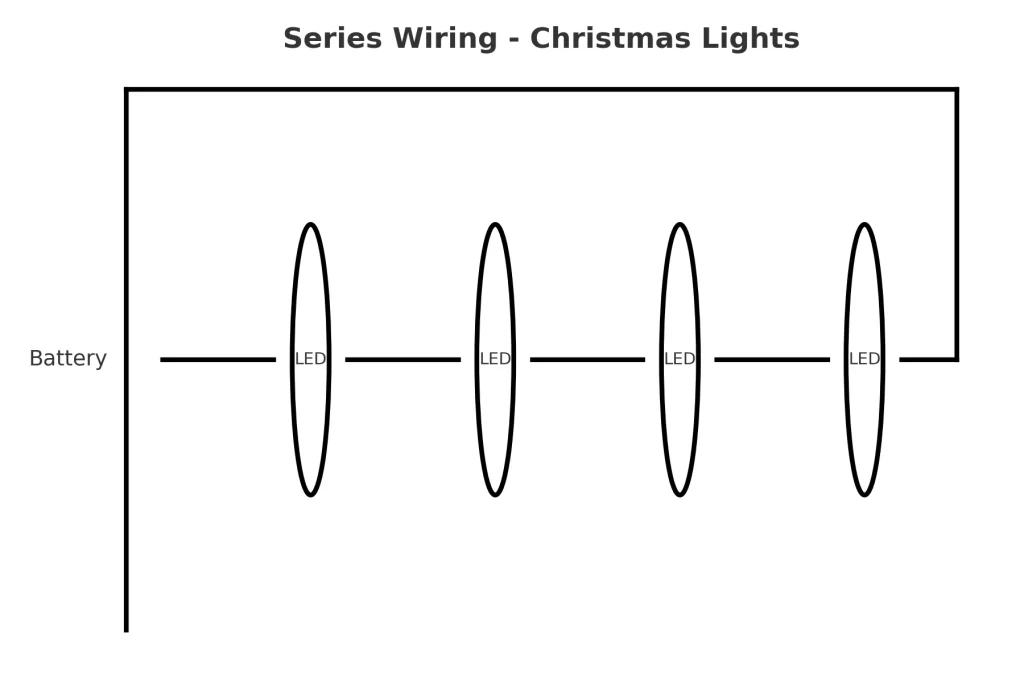
Series Wiring in Christmas Lights
In a series wiring setup, each bulb is connected one after another along the same path. Current flows from one bulb to the next, meaning if a single light burns out or a connection breaks, the entire string might stop working. This is why older Christmas light sets were so frustrating.
Many series designs now include a christmas light shunt, a small bypass inside each bulb that allows current to continue flowing even if one bulb fails. However, troubleshooting can still be tricky.
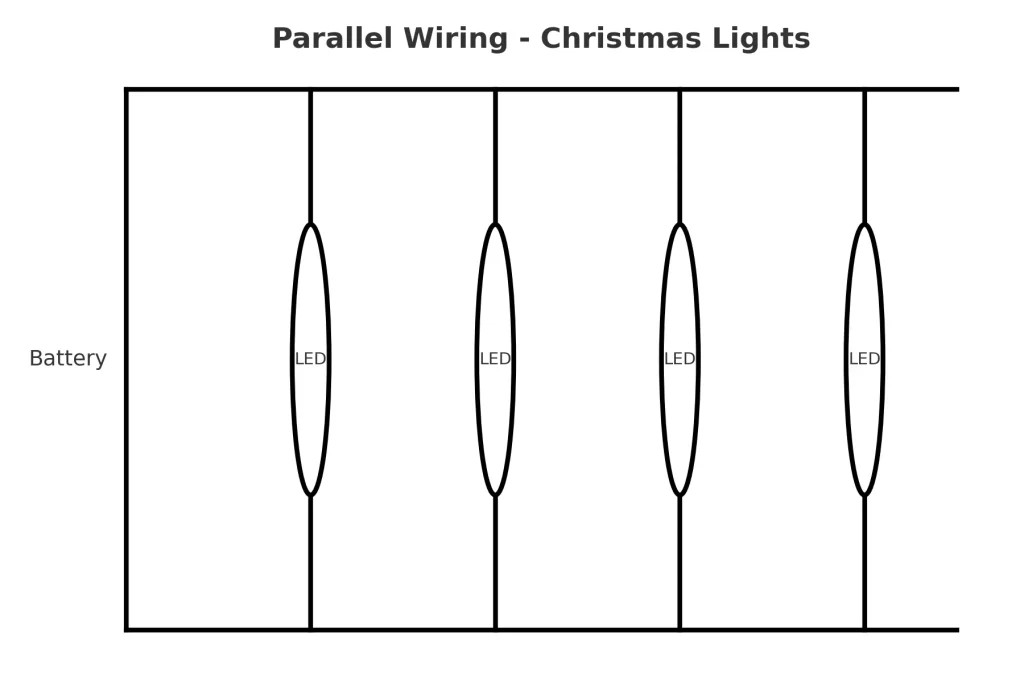
Parallel Wiring in Christmas Lights
Modern LED wiring often uses a parallel circuit christmas lights setup. In this method, each bulb has its own direct path to the power source. That means if one light goes out, the others stay lit. This design also allows different led wire colors and a more reliable christmas light circuit diagram, making installation safer.
Combined with the right wire gauge for LED lights, parallel wiring ensures your decorations shine bright all season without unnecessary hassles.
LED vs Regular Christmas Lights
A quick, professional comparison to help you choose the right lights and plan your led wiring for a safe, beautiful holiday display.
| Feature | LED Lights | Regular (Incandescent) Lights |
|---|---|---|
| Energy & Efficiency | Highly efficient; low wattage per bulb and lower overall power draw. Ideal for long displays and solar/ battery setups. | Consume far more power and generate heat; not ideal for extended runs or battery operation. |
| Lifespan & Reliability | Long lifespan (tens of thousands of hours); fewer failures, better performance in cold weather. | Shorter lifespan; bulbs burn out more frequently and are more fragile. |
| Heat & Safety | Run cool to the touch; reduced fire risk when led wiring and insulation are correct. | Run hot and can pose higher fire risk, especially with poor wiring or contact with flammable materials. |
| Wire & Installation | Often uses lighter gauge wire; however, choose the right wire gauge for LED lights for long runs to avoid voltage drop. LED wire colors are usually standardized for easier connections. | Require heavier wiring for high current; traditional setups may lack color-coded leads, making wiring less intuitive. |
| Color & Brightness | Bright, consistent colors with RGB options and controllers for effects. Minimal color shift over time. | Warm glow but less efficient color options; colors can fade and brightness drops as bulbs age. |
| Cost | Higher upfront cost but lower operating cost and longer life — better long-term value. | Lower initial cost but higher energy bills and frequent replacement costs. |
| Repair & Maintenance | Modular designs allow easy replacement of sections; LED wire colors and connectors simplify repairs. | Often require replacing entire strings or sections; troubleshooting can be harder due to series wiring. |
| Best Use Cases | Large displays, rooftops, battery/solar projects, and color-changing installations (use proper led wiring and controllers). | Small indoor displays or situations where authentic warm incandescent glow is specifically desired. |
Tip: match your wire selection to the total current and run length. For help choosing the right wire gauge or planning your layout, ask for a custom wiring checklist.
FAQs
What if there is no ground wire in a light fixture?
If your light fixture has no ground wire, don’t panic. Many older fixtures were designed this way. You can still safely install it by connecting only the hot and neutral wires. However, for extra safety, use a metal junction box that’s grounded or replace the fixture with one that supports grounding.
What gauge wire for LED lights?
The wire gauge depends on your LED setup. For most Christmas lights, 18 to 22 gauge wire is common. But if you’re running long distances or higher power LEDs, you might need thicker wires like 14 gauge for safe current handling.
Do LED lights need to be plugged in?
Yes, most LED lights need a power source. Some plug directly into outlets, while others work with 12V batteries or solar panels. The type of LED wiring you choose will determine the power source.
Do light fixtures need to be grounded?
Yes, grounding light fixtures is important for safety. It helps prevent shocks by directing stray electrical current into the ground. If you’re working with a light fixture without ground wire, consider upgrading to safer, modern fixtures.
What is GND in electronics?
GND stands for “ground.” In LED wiring, it’s the reference point for all voltages and acts as a safe path for excess current.
What size wire for LED lights?
Small holiday LEDs usually work with 22 gauge wire, while larger installations or long runs might need 18 or 14 gauge wires. Always match the wire gauge for LED lights to your power needs.
What kind of circuits are used in Christmas lights?
Christmas lights typically use series or parallel circuits. Older incandescent strings were series-wired, while modern LED strings often use a parallel circuit for reliability.
Do ceiling lights need to be grounded?
Yes, ceiling lights should be grounded to reduce shock risk. If you’re installing a new fixture, always connect the ground wire or bond it to a grounded junction box.
Why are Christmas lights wired in series?
Series wiring keeps designs simple and cost-effective. But the downside? If one bulb burns out, the entire string may go dark.
What are the 4 wires on LED lights?
On RGB LED lights, the four wires are: one common positive (+12V) and three negatives for Red, Green, and Blue channels
Are Christmas tree lights series or paral
It depends. Older lights are series-wired, while newer LED strings often use parallel wiring so one bad bulb doesn’t ruin the whole string
How to fix 3-wire Christmas lights LED?
For 3-wire LED Christmas lights, first identify the neutral, hot, and return wires. If one section goes dark, check for broken bulbs or a blown fuse. Replacing the faulty bulb or repairing the connection usually restores the string.
Conclusion
As we’ve seen, proper LED wiring is the backbone of safe, efficient, and long-lasting Christmas displays. From selecting the right wire gauge to understanding LED light wire colors and even checking the LED strip pinout, every detail matters. We also explored common issues and troubleshooting tips to keep your lights glowing bright all season.
Remember, safety should always come first whether you’re wiring a simple tree or a full outdoor setup. Ready to take the next step? Explore our other guides and find the best products to make your next LED project a success!

